Snow skin mooncakes are swiftly becoming the favoured treat over traditional mooncakes for the Mid-Autumn Festival. Known for its smooth, snow-like texture and delightful sweet fillings, this modern twist on a classic Chinese delicacy is gaining popularity as a make-at-home snack.
Our easy snow skin mooncake recipe makes customising the fillings easy and fun. By following our home recipe, you can customise the appearance of your snow skin mooncakes and control the ingredients to suit your dietary preferences.

Jump to:
What is it?
The snow skin mooncake, or "bing pi yue bing" (冰皮月饼) in Mandarin, is a unique twist on the traditional mooncake. Compared to the traditional baked treat, these snow skin mooncakes don't require baking and are much lighter to eat.
Originating in the 1960s from Hong Kong, snow skin mooncakes have gained a strong following in Southeast Asia thanks to their diverse fillings. You can find snow skin mooncakes with chocolate, mochi, ice cream, custard, and various fruits while still enjoying the timeless flavours of red bean paste and lotus seed paste.

Making Snow Skin Mooncake Dough
Making the dough is the most difficult part of any snow skin mooncake recipe. It requires precise measurements to get the right texture and thinness.

For the dough of our snow skin mooncake recipe, we use equal amounts of glutinous rice flour to create that lovely chewiness with a good bite. We also use milk and some vegetable oil to ensure the dough stays soft and plump.

Mooncake Press Molds, Mid Autumn Festival Mooncake Mold Set
Buy Now
Types of Filling
When it comes to snow skin mooncakes, the variety of fillings is truly impressive, especially compared to the traditional baked mooncake. Today, we will show you how to make three popular flavours: chocolate, red bean, and matcha mung bean.
Chocolate Filling
Chocolate filling adds a refreshing twist to the classic pastes like lotus seed or mixed nuts. It's not overly sweet, and its dark colour beautifully contrasts with the light, translucent wrapper of the snow skin mooncake.

There are many ways to make a chocolate-filled snow skin mooncake. We've seen some recipes include nuts or cereals for added texture while others use flavoured custard or cream. These are all great ideas. You can even use ice cream for a quick, fuss-free version. Our recipe uses a rich yet light dark chocolate lava ganache, the texture of which you can customise.
Chocolate Snow Skin Mooncake Filling Cooking Instruction
Here are the ingredients:
- 170 g dark chocolate
- 40 g unsalted butter
- ⅓ cup heavy cream
Instructions:
- Add the chocolate, butter, and heavy cream to a microwave-friendly bowl. Microwave it for 1 and a half minutes at 600 watts. Then, let the mixture rest for another 30 seconds.
- Stir together the mixture until it is smooth and free of lumps. Then, cover the bowl and refrigerate for 4 hours until it solidifies.
Red Bean Filling
Red bean paste is a beloved dessert ingredient in Southeast Asia. Made from boiled, mashed adzuki beans mixed with sugar, this paste is a traditional favourite that fits perfectly in snow skin mooncakes.
The no-bake method keeps the paste creamy and thick, rather than crumbly and dry. You can easily find red bean paste at Asian grocery stores, but we've included instructions for making your own if you prefer a homemade touch.

Mung Bean Filling
Matcha mung bean filling is a popular dessert choice in Japan. Mung beans have been used in Southeast Asian pastries and desserts for years. The green tea powder adds a beautiful hue to the mung beans, creating an aesthetically pleasing and delicious paste. In Asia, we've seen many bakeries and restaurants include this filling because of its unique flavour and visual appeal. With snow skin mooncakes, we see a blend of ingredients from around the world. Since matcha is a favourite for many and its texture is delightful, we've provided instructions on making this filling from scratch.
We hope you enjoy trying out these fillings inside our snow skin mooncake recipe and discovering your favourite flavour.

Snow Skin Mooncake (Chocolate, Red Bean or Mung Bean)
Video
Ingredients
- 144 g rice flour
- 144 g glutinous rice flour
- 72 g cornstarch
- 120 g icing sugar
- 420 g milk
- 65 g vegetable oil
- ½ teaspoon vanilla extract
- 5 tablespoon cornstarch for dusting
- food colouring optional
- 100 g chocolate filling
- 100 g red bean filling
- 100 g green tea mung bean filling
Equipment
Cooking Instructions
- For the dough, sift and mix all the dry ingredients together until they are mixed thoroughly.

- Mix the milk and oil in a separate bowl. Add the vanilla extract before mixing well.

- Make a well in the middle of the dry mixture before adding the wet mix. Add a few spoonfuls at a time, gradually mix in all of the wet mixtures. Make sure to stir each time until fully incorporated into a thin, runny batter.

- Loosely cover the bowl with cling film and microwave it for 1 minute at 600 W. Take the bowl out of the microwave, and lightly knead it with a spatula. Return the bowl to the microwave and cook it for another 1 minute at 600 W. Knead the dough with a spatula, while checking to see if there are uncooked (wet) parts. If it is not fully cooked, microwave for another 30 seconds. Repeat until cooked fully.

- If you want to add food colouring, then add it to the dough at this point. If you want to add multiple colours, then cut the dough into equal parts, add the colouring to the separate doughs and knead them. Once the colours are incorporated, combine the dough again and knead until smooth. You want to knead the dough while it is still warm. The dough will gradually harden as it cools. Then chill it in the fridge for at least 30 minutes.

- Measure 25 grams of filling and roll it into a ball using your hands. Imitate the size and shape of this initial ball until you have a similar size for each filling.

- Do the same for the dough. Measure out 25 grams of the dough and roll it out to a ball. Repeat until you've separated and rolled all the dough. You should have the same number of filling and dough balls.

- Roll out each ball of dough until it forms a thin circle. To roll, we recommend using a rolling pin and parchment paper, so that you roll it evenly, and prevent the dough from sticking to the rolling pin.

- Set the filling ball in its centre and wrap the dough around it like a dumpling. Pinch closed and smooth out the edges. Make sure none of the fillings is left uncovered.

- Dust the balls using the reserved cornstarch. Then, gently place the mould over and press the mould down. Hold for 10 seconds before releasing it.

- Wrap each snow skin mooncake in plastic wrap and cool for at least 3 hours before enjoying.

Recipe Notes
- After steaming, you can test if the batter is thoroughly cooked by piercing it with a fork. It should be stiff and no longer runny. The fork should come out clean, with nothing clinging to it.
- The cooked batter will come out slightly hard after steaming. Do not worry as it will soften as you knead it into a dough ball.
- You may prepare the dough earlier and chill it overnight. However, the freshly made snow skin mooncake dough will be softer and easier to handle throughout the process.
- We have also written guides on how to make a vegan-friendly green tea mung bean paste, as well as a no-oil red bean filling recipe for mooncakes and pastries.
- To make the two toned dough, we used 1.5 teaspoon of purple sweet potato powder combined with ⅓ of the dough and 1 teaspoon of blue pea butterfly powder combined with ⅓ of the dough.
Nutrition
Calories have been calculated using an online calculator. Nutritional information offered on Honest Food Talks is for general information purposes and is only a rough estimate.
Cooking Tips
Here are some cooking tips to help you attempt our mooncake recipe at home.

Making Two-Tone Mooncake Dough
Are you curious to know how some snow-skinned mooncakes have a blend of two colours for their dough? To do that, you need to prepare two different dough balls with different colours and combine them.

Reddit user Hanimomo used our recipe to make these adorable bunny snow skin mooncakes! She added food colouring to make the different tones and kneaded them together. We love how she also used these cute rabbit cake moulds to give these a mid autumn festival touch.
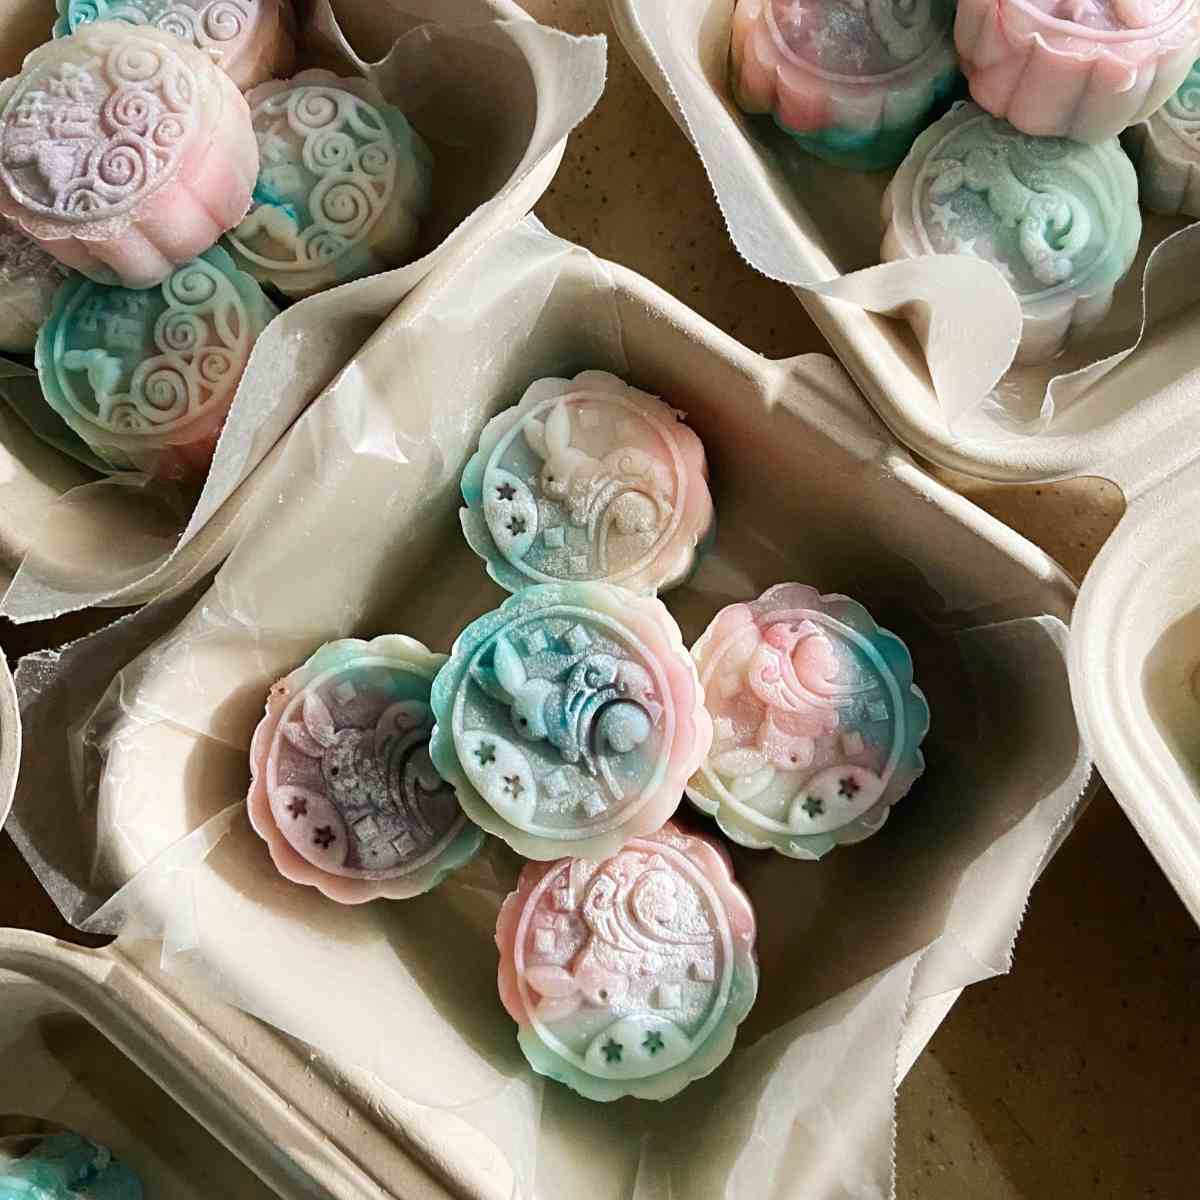
Using a snow skin mooncake mould
Don't add too much cornstarch; otherwise, the patterns will not be clear.

Remember to dust the inside of the mooncake mould too. This helps prevent the mooncake from being stuck in the mould.
When pressing down on the mould, use one motion and press down relatively hard. You don't want to press down multiple times as that may ruin the top pattern.
Once you press down, count to 10 before releasing. When removing the mooncake, gently lift the mooncake mould and allow gravity to pull down the mooncake. If it is stuck in the mould. You can push it down using the mould's mechanism, but make sure to push it down gently so as not to ruin the top pattern.

You will need a specialised mould for our recipe if you want the traditional shapes. However, if you don't mind how it looks, you can also use other types of moulds.
How To Store
These snow skin mooncakes can be stored in the fridge for up to ten days. However, we doubt they will go uneaten for that long.

Wrap individual tarts in plastic wrap or seal them inside an airtight container for maximum protection from the elements.
Gao Fen Vs Mochi Dough
There are two major types of dough used to make snow-skin mooncakes: gao fen and mochi dough.
Historically, the first doughs were made of gao fen (糕粉). This is a store-bought, cooked glutinous rice flour. It is steamed and baked for long periods to remove the harsh powdery taste that usually dominates raw rice flour. Upon eating gao fen raw, it melts in the mouth and has a sweet, light texture.

However, it is not easy to find gao fen. If you are lucky, it can be found online. Asian grocers rarely carry it since it is a speciality ingredient. Hence, it was used exclusively by restaurants while they were developing the recipe for snow skin mooncake.
Homemade gao fen often lacks the lightness and sweetness of the store-bought ones. For this reason, the wrappers are sometimes made with mochi, which is a sweet and fairly popular Japanese rice cake dessert.

For many traditional Japanese snacks, the mochi (mainly glutinous rice flour and cornstarch) is usually pounded in order to produce its representative chewy texture. In contrast, our recipe excludes the pounding process so that a thin, non-chewy and translucent wrapper dough can be formed.
This is why our recipe is made with mochi wrappers instead of gao fen, which is a more historically accurate ingredient for snow skin mooncake.
Without Shortening
Gao fen wrapper recipes also often include shortening. This is a solid fat that is often used in baking. It mostly refers to margarine. However, it is supremely unhealthy and requires an extremely light flour to balance it out.
Since this recipe is intended not to be very unhealthy or heavy, it is not used in our snow skin mooncake wrapper. This also makes our recipe vegetarian-friendly.
And that's a wrap - we hope you enjoyed making our snow skin mooncake recipe. Making these can be a truly magical experience, especially if you involve your family and friends. If you enjoyed our recipe, tag us on Instagram @honestfoodtalks and show us your creation.
Sandy
I tried these snowy Taipan mooncakes, they tasted amazing!!!
Now you've posted this, I can't wait to try your recipe!
Ling
This recipe is really great!!!! Thanks for sharing. I was initially unsure about it and thought that the recipe quantities seem oddly specific but the recipe is delicious 😋. Thank you so much again for sharing it.
Ezry
This turned out great when i tested your recipe. Looking forward to making a whole batch for the coming mid autumn fest! ty 🙂
Pei
Was inspired to make this after the recent Mid Autumn festival - and didn't realise that they were relatively easy to make ☺️ i thought you need special machines at first but didn't know u just needed a mooncake mould
K
Found this on reddit, great stuff
Rita
They looks so pretty